Mont Saint-Michel, Normandy: The Abbey Island, Tides, Best Visit Times and Photo Spots
Mont Saint-Michel sits in the middle of a vast bay on the Normandy coast, looking almost unreal when it rises out of the sea mist. It is not just a famous abbey: it is also a place ruled by water, light, and timing. If you arrive at the wrong hour, you may spend more time in queues than on the ramparts; if you arrive at the right one, you can watch the bay empty out like a theatre stage and see the “island” feel like an island again. This guide focuses on the practical details people usually need in 2025: how the tides really work, how to handle parking and shuttles efficiently, when to visit for calmer streets, and where to stand for the strongest photos.
Understanding the tides: why they shape your entire visit
The Bay of Mont Saint-Michel is famous for having the highest tidal ranges in Europe. Depending on the lunar cycle, the difference between low and high tide can be dramatic, and in peak conditions it can reach around 15 metres. That scale matters because it changes the entire scenery: the same viewpoint can show dry sand flats in the morning and open water around the Mount a few hours later. In other words, tides are not a side detail here — they are the main event.
One important practical point: published tide schedules for the Mount are typically based on Saint-Malo, and the local tourism office notes that you should add about five minutes to the times to match the bay more precisely. If you are planning a specific photo moment — for example, the Mount surrounded by water — those minutes can be the difference between “perfect” and “almost.” It is worth checking the official schedules close to your date rather than relying on general estimates.
During spring tides (when the Sun and Moon align in a way that increases tidal forces), you may also see the tidal bore — a wave that pushes into the bay against the river currents. This phenomenon is linked to the rivers feeding into the bay, and it is one of the reasons local authorities strongly recommend respecting safety rules and not walking out onto the sands without a qualified guide. The bay is beautiful, but it is not forgiving if you misjudge it.
How to plan your day around tide timing
A simple approach is to decide what you want visually first. If you want classic “island” views — water around the Mount — aim for high tide and build your arrival around it. If you want the dramatic sand patterns and the sense of scale in the bay, low tide can be even better, especially for wide-angle landscapes. Many visitors try to do both in one day by arriving before the tide turns and staying through the change.
For photographers, pairing high tide with either sunrise or sunset can produce the most striking results, because the water reflects colour and the silhouette of the Mount becomes cleaner. That said, you do not have to chase extremes to get strong images. Even mid-level tides can look impressive if you use foreground details — reflections on wet sand, the curve of the causeway, or the long leading lines of the bridge.
Finally, remember that the Mount is exposed to wind and fast-moving weather. A cloudy day can still give excellent photos because the texture in the sky adds mood. If your visit is short, your best “backup plan” is to prioritise good timing and viewpoints rather than hoping for perfect blue skies.
Parking, shuttles and the quickest way to reach the Mount
In 2025, private cars do not drive all the way to the Mount itself. The standard system is simple: you park in designated areas on the mainland, then use the free shuttle service (often called “Le Passeur”) to reach the Mount. This system protects the bay and reduces traffic pressure at the site, but the trade-off is that a visit can feel slow if you arrive at peak congestion without a plan.
The key time-saver is understanding that the shuttle is frequent and free, but queues can be long during peak hours. When you park, you can choose to take the shuttle, walk (a scenic option that many people prefer in good weather), or use other approved transport options. The official practical information sources emphasise that shuttles run between the parking areas and the Mount, giving a straightforward route for most visitors.
If you are travelling in high season or on a weekend, arriving early is the easiest advantage you can give yourself. It is not only about beating crowds at the abbey: it is also about avoiding delays at the parking gate and shuttle stops. If you arrive late morning in summer, you can lose a surprising amount of time before you even see the Mount properly.
The best arrival strategy to avoid wasted time
If you want a calm visit, arrive before the main day-tripper wave. In practice, that usually means aiming to be parked and moving towards the Mount in the early morning. This gives you quieter streets, easier access to viewpoints, and a better chance of photographing the Mount without a constant stream of people in every frame.
Keep your “crossing” flexible. If the shuttle queue is long, walking can be faster and far more pleasant — the approach is part of what makes Mont Saint-Michel special. On the walk, the Mount grows gradually in the frame, which is exactly what you want for photos. The bridge and causeway also give you different angles as you get closer, which helps you avoid taking the same shot everyone else has.
On the way back, consider staying later rather than leaving at the obvious time. Many people leave right after the abbey visit, which creates a rush back to shuttles. If you remain on the ramparts for late light, have a relaxed meal, or wait for evening atmosphere, the return trip often feels easier.

Morning vs evening: photography, crowds, and whether to stay overnight
Most visitors treat Mont Saint-Michel as a daytime stop, but the Mount changes character when the crowds thin out. Morning tends to be calmer and cleaner for images: fewer people, softer light, and a stronger sense of scale. Evening can be more atmospheric, especially when the lights come on and the streets feel less like a tourist corridor and more like a real historic place.
For photography, “best” depends on what you are chasing. Sunrise can give you gentle colour and fewer people, but it requires discipline, especially if you are coming from further away. Sunset can be spectacular because the bay can reflect warm tones, and you may also capture the illuminated Mount afterwards. However, sunset can also coincide with the tail end of peak visitor hours in high season.
Staying overnight is not essential, but it can be genuinely worthwhile if you enjoy quieter travel. When day-trippers leave, the Mount feels less pressured. You can walk the narrow lanes without being pushed along, and you can photograph the abbey silhouette and ramparts with a calmer rhythm. Many experienced visitors consider one night either on the Mount or nearby (with easy shuttle access) the best way to experience it without stress.
Photo spots that consistently deliver strong results
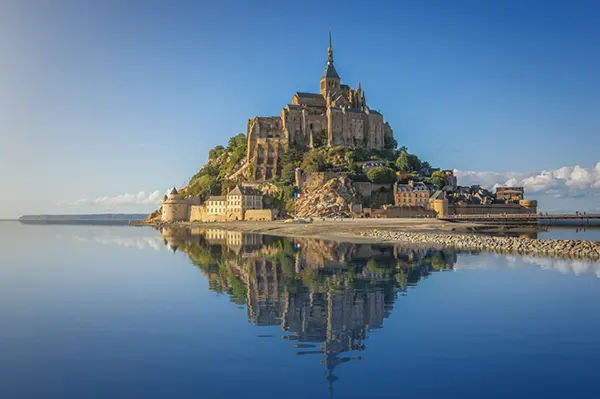
For classic postcard views, start from the mainland side looking towards the Mount, using the approach route as a leading line. The dam area and the long bridge approach are popular because they give you a clean composition with the Mount centred and the bay stretching around it. If the tide is high, you get the “true island” feeling; if it is low, you get texture in the sands.
For less common angles, look for viewpoints further around the bay rather than staying on the central approach. Some photographers favour quieter points on the edges of the bay where you can frame the Mount with grass, rocks, or distant shore elements. These angles often feel more personal and less like a copy of the standard tourist image.
Inside the Mount itself, the ramparts are your friend. They let you shoot outward over the bay at different heights, which changes how the tides look. A practical tip: if you want fewer people in shots, shoot earlier, and aim slightly away from the busiest stairways. Even in peak season, a small change of direction can give you cleaner frames.